
Okay, people, this is a long one, and a big one, so get ready to settle in, make a coffee, treat yourself, you’re worth it.
Crafting is BIG on the SWLOR server, it lets you make buildings, armour, weapons, med kits and so on. Most characters have some kind of crafting ability and they all work in broadly the same way. I’m going to cover that as briefly as possible, but with as much useful information as possible.
WARNING: If you really HATE grinding, a craft-oriented character is NOT FOR YOU.
PART 1: The Basics
This bit is about the skills in general and the perks within them, so you can figure out what the what.
1a) THE SKILLS
So, there are a lot of crafting skills on the server, here’s a list and a summary of the ones currently implemented:
Weapon Smithing: The creation of non-lightsaber weaponry, from greatswords to daggers.
Armour Smithing: The creation of all things wearable, Armor, boots, belts, etc SPACECRAFT ARMOR PLATING
Fabrication: The creation of buildings, land management devices and ASSEMBLING Spacecraft
Engineering: Blasters, Mods for gear slots, Harvesting and scanning gear, Lightsaber components… SPACECRAFT COMPONENTS AND MODIFICATIONS
Medicine: Helaing kits, Force kits, Stimulants (Buffs) and Resuscitation kits (Raise dead)
Lightsabers (This is a special case and is the most likely of these skills to be subject to change soon)
DOES WHAT IT SAYS ON THE TIN, but is for assembly only.
1b) Perks
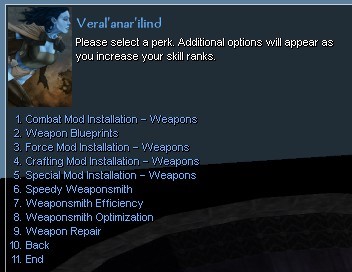
When you open up your rest menu to buy perks for your craft, you will see a list something like this. Now to summarise each one! Yaaay!
Mod installation Combat (Red) / Force (Blue) / Special (Yellow) / Crafting (Green):
This ability allows you to fit the mod of the noted color into the matching slot on whichever item type for which you have the perk. Engineering has these categories for creating all of these modifications.
Blueprints:
This perk unlocks more advanced blueprints with the following Pros/Cons:
Higher Base Item Level
Higher Base Durability
More Mod slots for modifications
More enhancement slots (Sometimes)
Speedy
This perk increases your creation speed by 10% per rank. HIGHLY RECOMMENDED TO SPEED THE GRIND. You can refund it once you’re a master if you need the SP back.
Efficiency
This reduces the base number of raw materials you need to make components AND the number of components you need to make finished products. HIGHLY RECOMMENDED TO SPEED THE GRIND.
Optimisation
This increases the total number of base materials you can put into a component item, and SHOULD also increase the number of components you can put into a finished product. Currently works for making components, but not finished products on all crafts (We’re working on it). THIS IS MORE FOR END GAME ITEMS. BUY IT LATER.
Repair
This improves your efficiency when repairing this item category when using repair kits, causing less durability loss and repairing more durability per use. Useful for preserving valuable items for longer.
PART 2: Making an item
So, here we are in the meat of things now! Let’s talk about making an item and what that might look like.
So, you click on a workbench and up will pop a menu of what you can make. This can be overwhelming at first, but you will get used to it. Don’t panic.
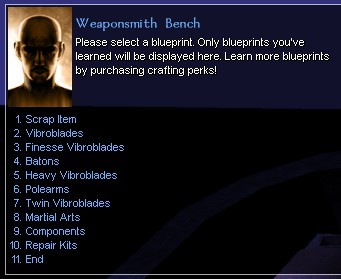
All of these selections will take you to a kind of item that your skill might make (I’m using weapon smithing for this example, but the principles are universal) EXCEPT FOR ONE (Dun dun duuuunnn)
Scrap Item
This option will open up a drop box. Any Raw material You drop in will lose all its properties and be reduced to a base level of Zero. This does not work on crafted items, be they components or anything else. This is used to avoid cluttering your item piece with properties you do not want, as well as keeping the total item level low. (These terms will make more sense later).
Now, let’s jump into an item at random and see what THAT menu looks like. (Hey, everyone! it’s Menus: The game!)
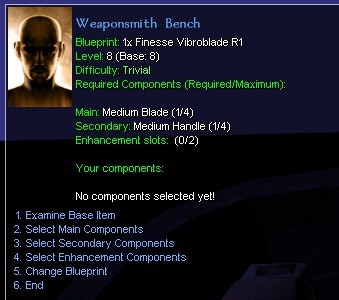
So, now we have a few more things to define!
Blueprint:: Just the name of the Blueprint
Level (Base Level) Okay, this is an important one to keep an eye on. If your total level goes too high, your chances of being able to transfer properties, and thus make gear with good bonuses is compromised.
Difficulty: This gives you a good indicator of the starting likelihood of properties transferring. Here’s a summary:
Required components: All items require at least one component or raw material to be made, these fields tell you which components/materials you will need.
(Required/Maximum) This tells you how many of each component you need to create an item and how many components you can potentially incorporate into an item. These are the numbers effected by Efficiency and Optimisation Perks.
Main/Secondary/Tertiary Components All items will have between one and three sections of pieces to put together to create the blueprint recipe.
Enhancement Slots These are slightly different from normal components as they are not required to create the item, but often Enhancement materials come along with stat bonuses and level increases of their own. Enhancement type items can also go on any item that has an enhancement slot, so long as the enhancement does not specify a restriction.
Select Main/Secondary/Tertiary/Enhancement These open drop boxes for you to drop your components in. Components are applied to the item in the order you put them in, which can be important for high quality crafting.
SO, the key point to remember when making an item when you start out is that you don’t want the level to exceed your skill level by 5 or more. So, if you have 10 [Craft], you can make items up to Total item level 14, but 15 is impossible until you skill up some more.
To that end, it is important to keep track of the level of the components going into your finished product. Using the example from the picture above, the Rapier is level 8 and needs 1 Blade and 1 Handle, but if you were to go into Components And look at those parts, you would find they are base level 1. This means that the actual lowest level this rapier can be is 10 (8+1+1).
You will make mistakes now and then, remember to be kind to yourself.
PART 3: Property Transfer
Okay, now we’re right in the very guts of the crafting system and we know about item levels and what those levels mean for our Base Property Transfer chance, expressed as a %.
Now, this is where things get complicated, my friends, as we need to start keeping track of a lot of things, which means slow going, or painful mistakes for the unwary.
To make good items, you’re going to need some preparation.
3a) Setting up for success
Transferring properties is complex and has a lot of variables aside from just your skill level relative to the recipe, but can be summarised with the three categories: Workshop Crafting Bonus Gear Material Transfer Degradation
3ai) WORKSHOP
Setting up a good workshop is essential to making top-end equipment. How does one do this, I hear you ask? Okay, it’s simple, but can take time and credits.
You effectively go through the same process as you would in furnishing a house for the XP bonuses
(Found in section 4 of Amons Guide to Getting Started), but instead of selecting it as a Residence, you use your structure tool to declare it as a Workshop.
Workshop atmosphere bonuses do not give bonus XP, but do provide you with other advantages at the following points:
| Workshop Atmosphere Effects | |
|---|---|
| Atmosphere % (0%-150%) | Effects |
| 0% | Crafting skill modifier 50% |
| 10% | Crafting speed increase 10% |
| 30% | Base Property Transfer +2%* |
| 50% | Crafting Skill Modifier 60% |
| 90% | Crafting Speed Increase 20% |
| 120% | Base Property Transfer +4%* |
| 150% | Crafting Skill Modifier 70% |
| * Only when Base Transfer % is below 90% |
Ideally, you want your workshop to have full atmosphere (150%), AND your work benches AND room for some storage to make you life easier. The good news is that it’s not hard to do, the bad news is you’ll need to enslave a Fabricator to help you.
(Amons Guide to Buildings)
3aii) CRAFTING BONUS GEAR
Alright, so now we’ve got our workshop set up, we’re ready to make the best stuff evar, right?! WRONG. Even the very best workshop will only take you to a STARTING transfer rate of 90%, and as I will detail in Material Transfer Degradation That % drops the more properties you try to give to an item. So, what do we do about it?!
The answer is crafting gear.
Wait, WTF, Amon, you giant, rotating dingus. We -need- gear to -make- gear? We hate you, you monster.
Hate away, friendo, but it’s the truth! if you have gear with +[Crafting Skill] on it equipped when making things it can raise your transfer chance to 100% and beyond.
Why would we need more than 100%, Amon, you flappy jammy dodger?
Well, because each material you put into an item degrades your transfer chances cumulatively, sometimes as much as -19% PER MATERIAL. That stacks up pretty quick, let me tell you. I’ll be talking about that in more detail soon, but…
I’m sorry… The time has come for… MATHS (Screams, thunderclap)
The equation for your total transfer % looks like this:
(Base % Chance + Workshop bonus if applicable (2% or 4%)) + ((Total gear Bonus x Workshop Crafting Skill Modifier)/4)
I know some of you had to run crying from the room there, and I feel you, so here’s a fun little spreadsheet that will tell you precisely what your starting transfer chance % is so you needn’t use the dreaded maffs! Enjoy!
3b) MATERIALS
Now, our materials come in a wide variety of selections, but overall what you want is the most bang for your buck, or in this case, the most Property Levels For your Material Level. Okay, this is where things can get confusing.
Property levels are the Bonuses you get from your raw material, these usually vary from +1 to +3
Material Levels Are how much +level a material adds to your component and thus the finished product. These levels vary from +1 all the way up to +10.
Well, this is easy, I hear you say! Just get all the level 1 stuff with +3 bonuses and laugh all the way to the bank! Broadly, this is absolutely right, with one teensy catch. The lower the Material level of an item, the HIGHER its Material Transfer Degradation Illustrated by this handy chart:
Now, keep in mind that these % drops come AFTER the property transfer, so the first material will always transfer at your highest transfer %. It is the materials that come after which suffer.
Okay, but what does that mean?
To put it simply, when you’re putting materials of mixed levels in, go from highest Material Level To lowest Material Level.
COMPLETELY IGNORE Property Level for these calculations.
What does this look like in a practical sense? Well, let’s say you have a component that holds 6 Materials. You decide you want to go all out and throw on six +3 Veldites, like a total mad person because you’ve got yourself a starting 100% transfer chance. How does this pan out, since each Veldite after the first is going to kick you down in the range of 1 to 19%?
Veldite 1: 100% Transfer chance
Veldite 2: 99-81% Transfer Chance
Veldite 2: 98-62% Transfer Chance
Veldite 3: 97-43% Transfer Chance
Veldite 4: 96-24% Transfer Chance
Veldite 5: 95-5% Transfer Chance
Veldite 6: 94-0% Transfer Chance
As you can see, the number range starts to get very wild and the chances of you losing transfers increases very, very swiftly. You can still get lucky, however! Instead, let’s look at combining 3 level 3 Materials and 3 Level 1 Materials. Remember to use the high level ones, first.
Level 3 Material 1: 100%
Level 3 Material 2: 99-94%
Level 3 Material 3: 98-88%
Level 1 Material 1: 97-82%
Level 1 Material 2: 96-73%
Level 1 Material 3: 95-54%
Notice how this greatly preserves your transfer chances. It will, however, increase the Item Level of the component. The first Component comes in at Base Level +6, Whilst the Second comes in at Base Level +12 (3x3+3), but both would have the same Property Level If they both had perfect transfers, so it becomes a balancing act.
When combining components into a final item, this process is repeated, but using the components Item Level Instead of the Material Levels The degradation will still occur for every property transfer, but components tend to have a higher Item Level and thus your transfer chances degrade less sharply once you get to this stage.
For example. Let’s say we somehow pulled off Item 1 with lucky transfers and the component we were making had a base level of 1. We now have an item with 6 properties and an Item level of 7. When combining Components into completed items, we now use Item Level as if it were the Material Level. Assuming a starting 100% transfer chance once again:
Property 1: 100%
Property 2: 99-97%
Property 3: 98-94%
Property 4: 97-91%
Property 5: 96-88%
Property 6: 95-85%
So, as you can see, if we can move our components Item Level to 5 or over, the chances of successful property transfers greatly increase, no matter the base Material Level of the raw materials.
IMPORTANT NOTE When combining components into a final item, -Each Component- Starts its property transfer rolls fresh, so the Degradation From Component 1, will not carry over to Component 2 and so on. Spread your bonuses across multiple components to improve your chances.
Part 4: Grinding
Okay, so, we’ve covered the juiciest bits, but now we have to talk about the Grind. Any kind of crafting is going to need a significant time investment, but here are a few tips to get your crafting grind done more swiftly and with the minimal of effort.
4a) Get yourself a fully furnished residence. This amounts to a +150% XP gain, easily the biggest boost you can get, more than halving your grind.
4b) Get yourself a Maxed out workshop. The speed and Transfer chance increases will be super useful.
4c) Buy some gear from an established crafter to lift your crafting skill bonus and increase your property transfer rates.
4d) Invest in the Speedy perk. The time it saves you on crafting is more than worth the SP
4e) Get your Biography tagged by a DM for an extra 5% XP
4f) Invest in and learn to use the Molecular re-assembler so you can recycle crafted items into usable materials and reduce your materials grind.
Right! Got all that stuff? GOOD. Okay, this is how you get a maximum amount of milk for a minimum of Moo on the crafting cow farm:
Use the lowest level blueprint you can
Put properties on its components until it is of Moderate, Easy, Very Easy or Extremely Easy difficulty. (Your skill level, or up to 3 levels below)
Make the item! You get a base of Xp for the DC of the item, but you get bonus XP for every property you successfully transfer, making low difficulty, high property items better XP than High difficulty items.
Melt the item down for materials using the re-assembler.
Repeat.
PART 5: A few little tips for being a good sport.
If you want to be a weapon smith, grinding Baton Cs will be very efficient, as they require the same material for all components and can be broken down into that material.
If you make an item with a base DC of 1 or 2, you can make one of your components high enough to get XP from as well as your final assembly, doubling your gains!
If you want to learn fabrication, prepare for sadness, as Fabrication items cannot be reassembled.
While grinding Armour Smithing, make and re-assemble heavy armors for a free +3AC material every time!
When grinding medicine, you get XP for both making AND using Medical items, so make sure you get hurt a lot!
There’s more to discover, and if you need specific tips for a craft, let me know!